
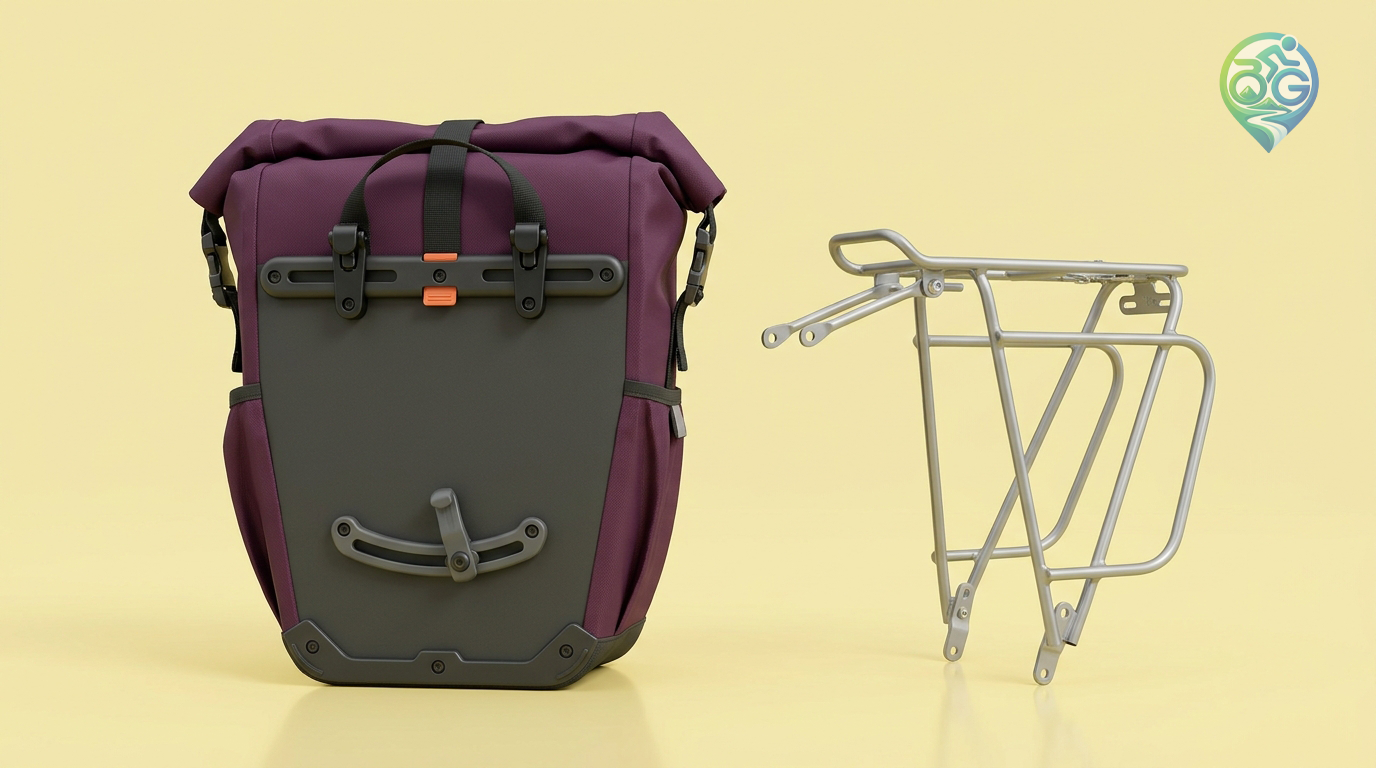
Look behind a pannier before filling it. The useful question is where its mounting parts meet the rack: the two upper hooks, their adjustment rail and the lower restraint. A pannier mounting check starts with those contact points visible and the bag empty. Set the bicycle somewhere stable so you can inspect the back panel without balancing a loaded machine or reaching around moving parts.
Match the hardware before adjusting the position
Record the bag model and mounting-system name, then measure the upper rack tube. ORTLIEB’s compatibility FAQ begins with that tube measurement when identifying suitable replacement hooks. The diameter alone does not identify every part: retain the system name and photographs when asking for a replacement. A hook insert from a similar-looking bag is not a confirmed match.
Check the profile as well as the dimension. Information for a round tube does not automatically approve a square or flattened rack section. Send the actual shape and measurements to the manufacturer if the instructions leave that combination unclear. Avoid forcing a hook over a tube or hiding a loose fit under improvised layers of tape. Resolve the hardware choice before using its adjustment range to move the bag.
Give the latch a separate inspection
For QL2.1, ORTLIEB’s mounting-system overview explains that lifting the carrying handle opens the upper hooks and releasing it closes them. Watch the moving latch engage on your actual equipment. A bag resting on the rail can look settled while a hook remains open. Do not treat downward weight as evidence that the retention mechanism has closed.
Other mounting systems need their own instructions. Even within one brand, a different generation may use different hardware or operation. Keep the relevant manual with the bag’s model details instead of relying on a remembered adjustment from an older pair.
Find the lower restraint’s working position
Identify which rack support the lower hook is intended to capture. Gently check whether the bottom of the mounted bag can swing away, while watching that contact point. The QL2.1 overview describes a lower hook that can be moved and rotated on its rail. Use the adjustment method for your model; a mudguard stay, brake hose or another unrelated component is not a substitute rack support.
Inspect the rail, hook and fasteners before proceeding. A cracked fitting, missing fastener or latch that will not close calls for the correct replacement or workshop assistance. Photograph the fault and supply the product identity when asking for help. Adding luggage to press a damaged assembly into place does not complete the fitting process.
Test heel clearance with the luggage you will carry
With the bicycle held securely, move through a slow pedal stroke in your normal riding shoes and check the space behind your heel. Adjust within the mounting rail’s permitted range, retaining proper upper-hook seating and the lower restraint. If those conditions cannot coexist, reconsider the rack-and-bag combination rather than pushing a hook beyond its allowed position.
Repeat the check after packing. A filled bag may have a different outline from an empty one, and loose straps need gathering away from moving parts. Your weight distribution should work with the available clearance. When choosing a bag arrangement, leave the release handle and closures accessible for ordinary stops instead of burying them under other equipment.
Use the load limits specified for the bag, mounting system, rack and bicycle. Distinguish a single-bag allowance from the rack’s total allowance. This guide offers no universal pannier weight limit, and replacing one fitting does not raise the permitted load of the remaining components.
Make a short loaded ride part of the fitting
Include a quiet local trial in your long-distance preparation. Stop to inspect the closed hooks, lower restraint and possible new rubbing marks. Investigate fresh movement or noise before extending the ride. When sharing one pannier between bicycles, verify the fit again on each rack; the working position on yesterday’s bicycle is not an automatic setting for today’s.
Discussion & Comments 0
Share your thoughts, gear experiences or ask questions about this guide.
No comments yet.
Be the first to share your thoughts!
Join the Discussion
Log in with your Bisikletli Gezgin mobile account to participate in discussions and track your contributions.