
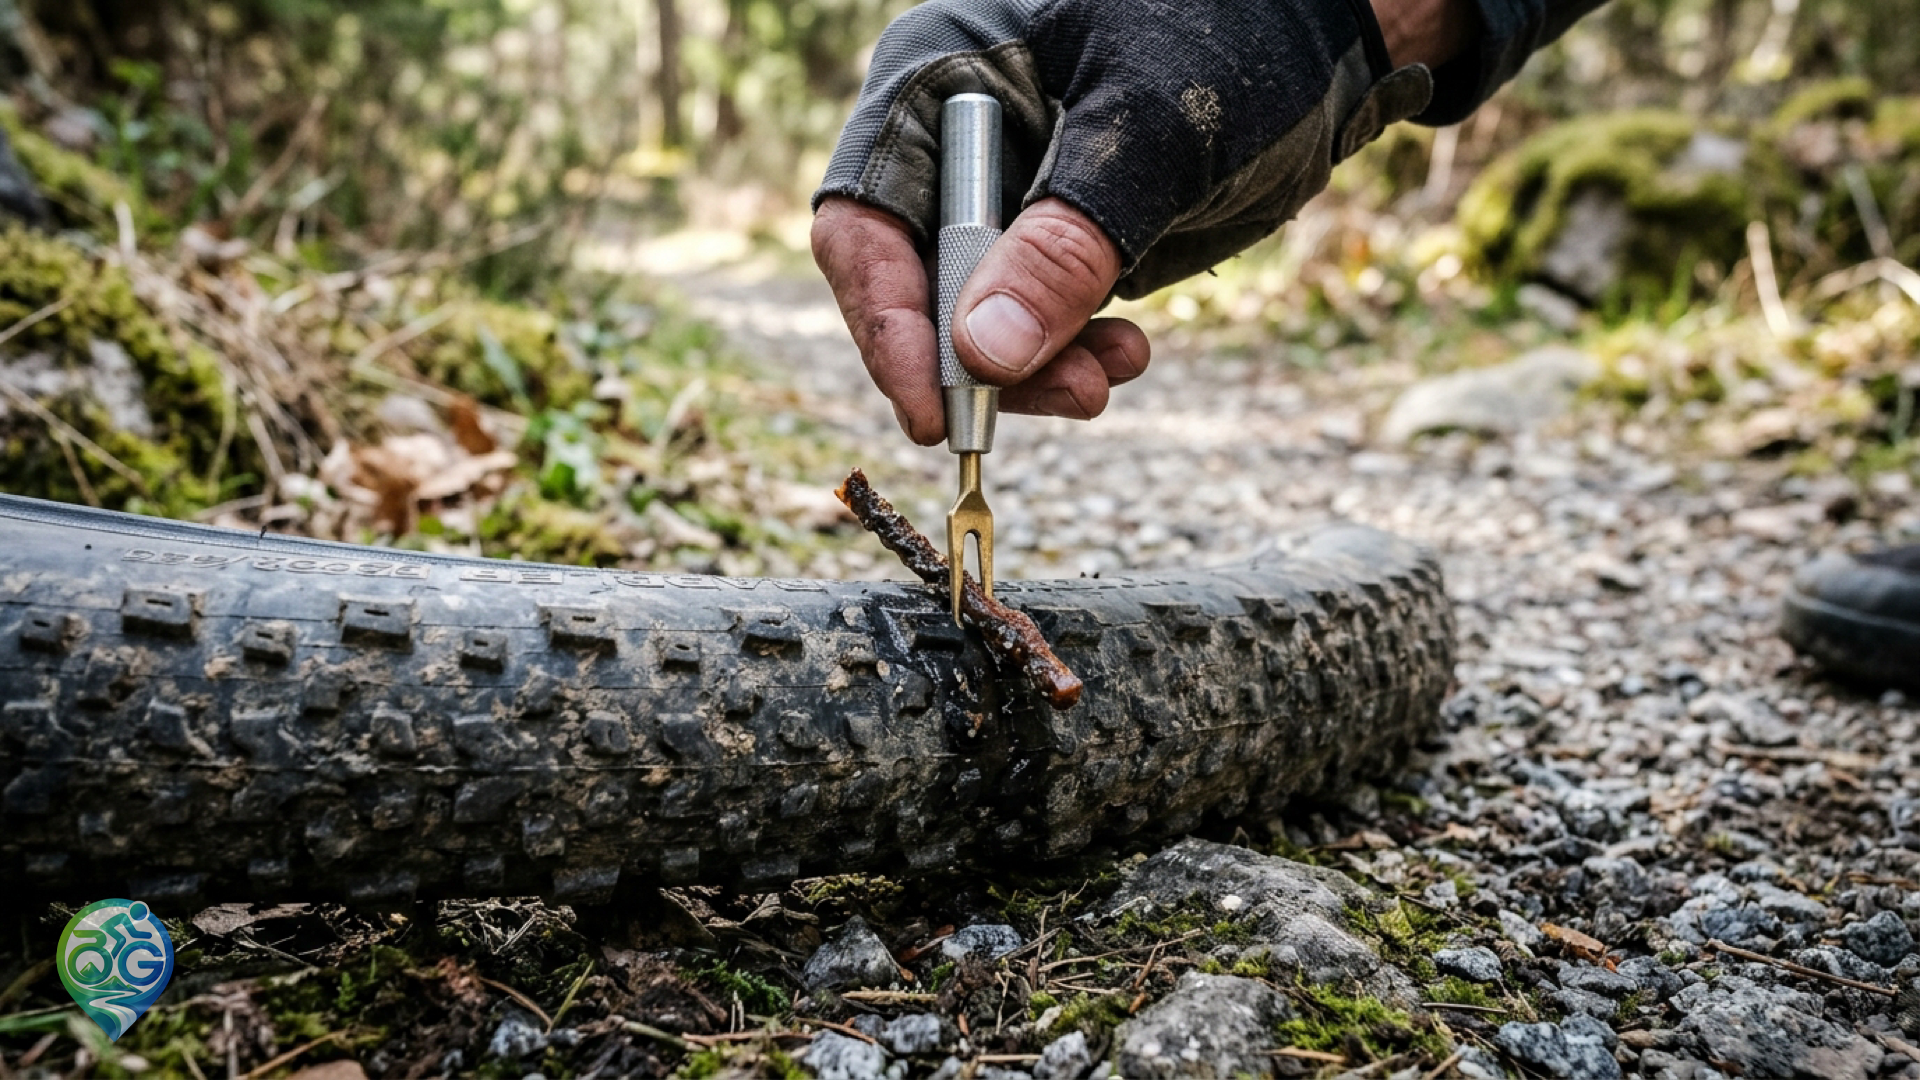
Tubeless setups on modern gravel and mountain bikes effortlessly seal tiny thorn pricks and glass splinters thanks to liquid latex sealant. Yet when sharp flint or ragged rock edges slice a 2 to 4 millimeter gash into the tread casing, escaping air pressure and liquid sealant overwhelm natural clotting. Instead of unseating the tyre bead to fit an emergency inner tube, installing a tubeless bike tyre plug provides a durable trailside fix in minutes. These vulcanised rubber strips, commonly known as bacon strips, physically bridge the carcass split and combine with internal latex sealant to restore an airtight mechanical bond. Knowing how to locate the gash, load the insertion tool, and seat the plug keeps you rolling without losing valuable trail daylight.
Locating the puncture and prepping the prong insertion tool
An audible hiss accompanied by white liquid spray quickly pinpoints the rupture. Pulling over before tyre pressure completely collapses makes locating the puncture much simpler. Stopping with the gash positioned at the twelve o clock position prevents precious liquid sealant from pooling at the bottom and spilling onto the ground. If the puncturing thorn, nail, or sharp flint shard remains lodged in the tread lugs, pull it out cleanly using needle-nose pliers or trail multitool jaws before attempting insertion.
Choose an appropriate plug thickness: standard 3.5 mm strips work best for aggressive cuts, whereas slim 1.5 mm plugs seal pinpoint splits between tyre knobs. Thread the rubber strip halfway through the eye of the split-prong metal insertion fork, leaving equal lengths protruding on either side. Avoid touching the tacky adhesive surface with muddy cycling gloves. Before inflating later on, ensure your valve core flows freely by following proper blocked tubeless valve core cleaning and replacement procedures to prevent air blockage.
Insertion technique and crucial angle alignment
Hold the loaded prong tool perpendicular to the tyre casing and push firmly directly into the puncture opening. Push until approximately two-thirds of the plug enters the internal tyre cavity, leaving 4 to 6 millimeters of folded rubber tail visible outside the tread. Inside the tyre, the doubled-over rubber expands into an anchor knot. The most critical mistake is twisting or rotating the handle while pulling: always pull the fork straight back out along the exact entry path without any twist. Twisting severs the rubber strip and destroys the internal anchoring knot.
External tails usually flatten against the tyre surface as you ride over dirt, gradually wearing flush with adjacent rubber knobs. However, if excess rubber threatens to snag on chainstays, fork arches, or mudguards, trim the protruding tips with a sharp blade leaving a safe 3 mm stub. Consistent adherence to tubeless tire setup and maintenance principles ensures the internal plug remains bonded to the casing indefinitely.
Re-pressurising and circulating protective sealant
Once the plug is securely seated, connect a dependable hand pump or threaded CO2 cartridge to restore optimal riding firmness. Target manufacturer pressure recommendations and consult our bicycle tire pressure guide for rough terrain to safeguard your wheel rims from harsh rock strikes. Ensure your pump head locks tightly onto the Presta valve by verifying bicycle pump valve compatibility check points beforehand.
Spin the wheel vigorously for ten to fifteen seconds and bounce the tyre against the ground. This centrifugal motion distributes liquid sealant directly over the internal plug knot, allowing micro-fibres to knit the rubber interfaces shut. If faint bubbles still hiss around the plug margin, rotate the wheel so the plug rests at the very bottom for thirty seconds, submerging the wound in sealant until complete airtight closure is achieved.
Discussion & Comments 0
Share your thoughts, gear experiences or ask questions about this guide.
No comments yet.
Be the first to share your thoughts!
Join the Discussion
Log in with your Bisikletli Gezgin mobile account to participate in discussions and track your contributions.